
Happy Mail Monday
It’s time for some Birthday Card fun here at A Stampers Mailbox! Today I use a 6″ x 6″ Designer Series Paper sheet and turn it into a slim line card. Our oldest son’s girlfriend loves to paint with acrylics and she works with bold colors and bold design and her birthday is at the end of the month!
Time to make a card!
The new Fancy Flora DSP is about bold design and daring colors. I grabbed this sheet out – as it has the most monochromatic color way. Perfect for some Taco’s right?
Let’s have some fun with this!
Supplies:
-
Equipment: Paper Trimmer, Die Cut Machine, Stamparatus ( or other Stamp Positioner)
-
Stamps, Ink Pads, Paper, Water Painters (DSP, Watercolor & regular Cardstock)
-
Designer Series Paper (DSP) /Patterned Paper: 6″ x 6″
-
Basic White Cardstock: Inner layers 1 3/8″ x 5 7/8″ (2) & 2 7/8″ x 5 7/8″ (1) , Scrap for outer greeting
-
Adhesive: Liquid Glue & Tear n Tape
-
Other: paper towel, DIY Envelope <template included>

Inspiration for today’s FYIF is the birthday gal this card is for. Her birthday is the 28th and she loves to paint. This entire package of Designer Series Paper ~ Fancy Flora in the recent Mini Catalog release is all about the hand painted look. The colors and hues of this sheet paper are kinda hard ( for me ) to use so I challenged myself to make a fun birthday card with her in mind.
The new Taco Fiesta stamp set is just that FUN! Way to go Erica Cerwin! She is the designer of this stamp set! You can find it on page 48, I’ve had alot of fun with it so far! This card, another slim line card you can find over on A Crafters Collaboration and a gift tag.
( I will link to the gift tag project later in the post)
Alrighty, I can jibber jabber about how fun this stamp set is, now, let’s move on to the project!

First, let’s gather the supplies you will need. Shown above is the 6″ x 6″ DSP folded ‘gate fold’. This is easy – no scoring needed- roll up the sides into the midline- where the two edges meet in the middle so that each side is the same. If you are not confident in doing this you can score it at 1 1/2″ inches on both sides. This will make the side flaps 1 1/2″ and the inner section 3″ for a 3″ x 6″ card.
TIP: Score DSP lightly as it can tear easily.
Next Steps
-
Grab your Stamparatus to stamp the outside greeting, belly band images and inner sentiment.
-
Ink with Tuxedo Black or any other water safe black ink.
-
I used Fluid 100 Watercolor paper- any Multi-Media or Watercolor paper will work perfectly
-
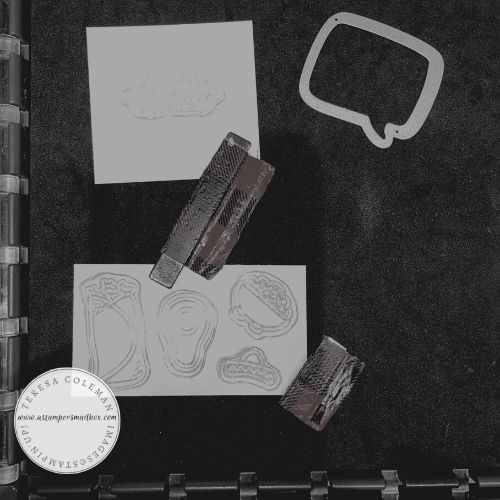
( This photo is not the best quality – I wanted to show the stamps before I picked them up on the stamping plate. )
-
Color the images – I color with ink pads and a water painter. You can color these images with your favorite coloring medium ( Stampin’ Blends, Watercolor Pencils, Pastels, anything in your crafty stash!).
TIP: the perfect guacamole green is Crushed Curry & Granny Apple Green inks mixed together!

-
Fussy Cut the Taco Fiesta images, Die cut the conversation bubble around the outer greeting
-
Place the center Basic White card stock into Stamparatus and stamp any Happy Birthday greeting you like inside.

-
I chose the birthday greeting from the Art Gallery Stamp Set. Add in a taco at the bottom right and a sentiment on a side panel. Quick and Easy inner stamping.
Now you are ready for Assembly!
Let’s start with the belly band. This card shape and weight when adding the cardstock to the inner sections doesn’t allow this card to stay closed on its own.
A band shape works perfectly for this style of card.

Now time for some die cutting.
The new Conversation Bubbles die set and companion stamp set are super cute.
You can save 10% when buying them together in a bundle!

This die cuts 2 shapes and embosses one of them in one quick pass through the die cutting machine! I’m using the Mini Stampin’ Cut & Emboss.
Did you know that when you sign up to become a Stampin’Up! Demonstrator during Sale-A-Bration (Jan & Feb 2023) you can get a limited edition Boho Blue Mini Stampin’ Cut & Emboss Machine?
It’s super cute- click on the photo above to learn more!

This photo shows the opposite side of the DSP that I’m using for the card base. I wanted to feature the colors of the images and band into the Conversation Bubble.

Isn’t it neat how this one die makes both shapes.
If you look closely on the white outer piece you can see the embossing detail.

Now all the layers are ready – except, I started with a strip of Crushed Curry Car Stock thinking that the simple single color would work on the Designer Series Paper. Turns out- it was too bland and blended into the DSP too much. With the addition of Smoky Slate & Real Red strips – it’s just the thing!
Band Measurements:
-
Smoky Slate (not pictured ) 1 1/4″ x 6 1/2″ Score at: 2″ & 5″
-
Crushed Curry 1″ x 6 1/2″ Score at 2 1/16 & 5 1/16″ – this is a smidge more than the Smoky Slate or you can just gently wrap the crushed curry around the Smoky Slate once you have the grey put together with Tear n tape. You don’t want the band to be super snug – just a gentle fit.
TIP: dry fit the Smoky Slate to the card before adhering the strip together.
-
Real Red (not pictured above) 1/8″ x 6 1/2″ (2). Thinly run a strip of liquid glue (be light on the glue here it can get messy quick!) Wrap those thin strips of red cardstock around the band top/bottom.
Conversation Bubble: How to make it appear attached & floating:

The outer edge of Conversation Bubble and inner greeting portion are not connected so we need a way to make them stay put. I used strips of Crushed Curry (any cardstock will work it will be hidden). I used 1/4″ strips to make it easy to use dry adhesive. Attaching a strip of Tear n Tape or any double sided adhesive makes quick & sturdy work of holding these in place.

Add a third strip to anchor the sentiment bubble to the front of belly band.

It’s ugly back there- add a 2nd bubble die cut to in white to cover it all up!
Band all done:)
Would you like to see a fun gift tag made with these images?
Click on the photo above to hop out to view that blog post!

TIP: When coloring on regular Basic White Cardstock- use caution when adding water. I avoid it- I use a dry medium or blender pens. In the inside of this card I grabbed watercolor pencils & a blender pen. It was added as an afterthought – I think the added images are just the thing.
While you have the ink pads out and watercoloring the belly band images- use the Blender Pen in the ink- it would work beautifully! Without needing additional coloring tools. I will add the Blender Pens to the Supply List.
This card style is a ton of fun and you could use any color or style of patterned paper as a base! I would love to see your creations! Share them with me as photos- leave me a comment and share! I would love to feature your crafty cardmaking in a photo gallery post!
It’s a 3 x 6 Slim Line card so of course it needs a DIY Envelope – here’s a template for you!
It also links to a previous blog post all about envelopes – check that out by clicking on the template.

Check out the supply list above! Stampin’Up! places everything in a neat all in cart. It’s a long, full cart and likely has many things you already have in your crafty collection. Simply un-check what you don’t need! Happy Shopping!

Be sure to use that host code when your order is under $150 (US) and grab some of those fun
Sale-A-Bration items while you are shopping!
Happy Guacamole Birthday to A!!
Crafty Inky Hugs!
Teresa
