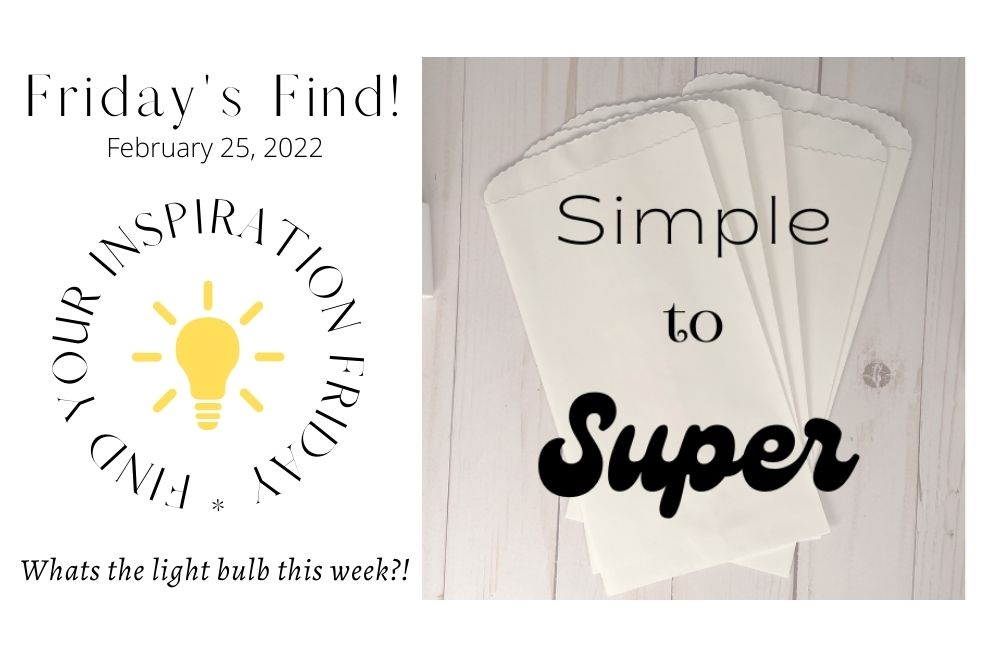
Welcome to Find Your Inspiration Friday aka FYI*F*! Today, lets go from simple white sacks to super cute with stamping. These sacks are the inspiration source for all this inky fun!
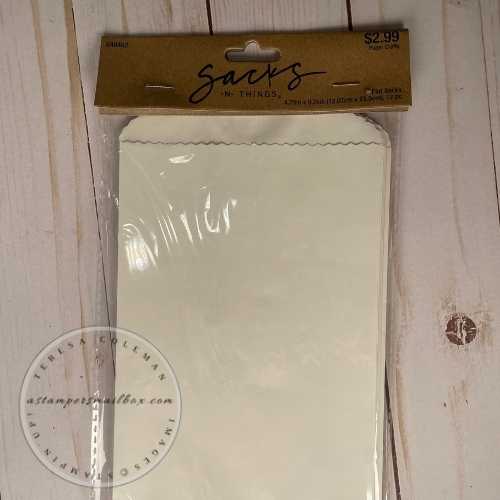
Here we are with 5 blank sacks. I love white space and would have alot more of it in the house if Hubs would embrace the white. Nope- so I love it even more on cardmaking and paper projects.
These caught my eye on a shopping trip through Hobby Lobby last year during the Christmas season and have been hanging out waiting for inspiration! This stamp set triggered the light bulb!
The Stamp Set Flowering Tulips is found in the current Mini Catalog and it’s a stunner.
A Two-Step stamp set along with some super sentiments! I’ve used it in very simple ways for today’s 5 ways post to introduce it. I will be using it more in the coming months as winter will be giving way (soon we hope) to spring! Our tulips began poking up last week before the winter ice storm – poor babies! They were about 2 inches tall and beautifully green. Now?? who knows, the ice hasn’t melted yet!
Let’s Get to Stamping!
Let’s create 5 different projects using a few ink colors and lots of fun Stampin’Up! products!
What would you jazz these up with?
Number One
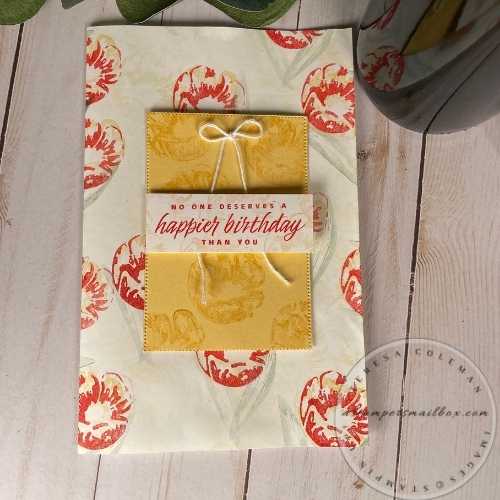
Granola Gift Sack With a Window
I’ve been craving granola and this recipe is a winner! Why not share it with a friend – this sentiment is perfect! “Let Today Be The Start of Something New”. Granola is one of my fav breakfast treats with yogurt & frozen blueberries – yum yum. Thank you to www.wholeandheavenlyoven.com for Sarah’s Large-Cluster Almond Granola. This one is jam packed with nutrition and healthy fats. Click on the photo to take you out to the recipe.
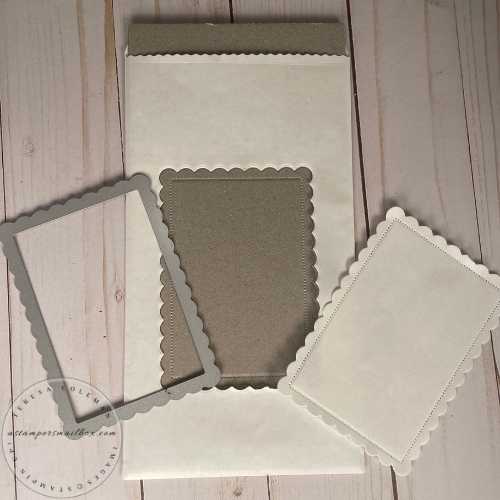
While it was baking, I made a scalloped window to see the good stuff.
You need to insert something inside the white sack to prevent your die cut shape from cutting through both sides. I used a piece of scrap chip board cut down to slide in snugly.
The Scalloped Contours Die Set made a great window.
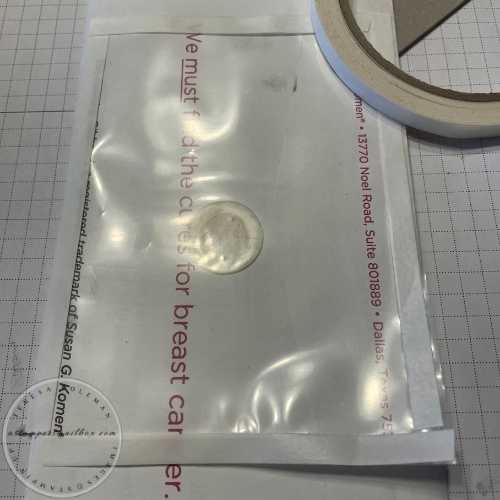
Now time to insert the window sheet.
There are a number of ways to approach this – I grabbed a piece of mail off the table and used a removable stick dot in the middle of the window sheet. Adhering the window sheet to a movable flat surface allowed me to test fit the window sheet without feeling like I need 2 sets of fairy sized fingers.
Once I felt confident the size of the window sheet was right, I grabbed my roll of Tear n Tape adhesive. I wanted a dry adhesive with a backer for this – to allow me to slide the window sheet into the narrow opening. These sacks are flat non gusset so they don’t have alot of open space to work.
Once the mail & window sheet combo are fit in to your liking – use a You Pick Tool or a Paper Piercing Tool to lift the backing off one side. This is a the fiddly part and has you wishing for the fairy sized fingers again.
Once you’ve removed all the backers, the window sheet and sack are now one – removing the sticky dot and the envelope is easy.
Thinking outside the box here- if you have another idea and approach to assembling this project – I would love for you to input a comment here on the blog so that we can all learn from each other!!
I brought the first photo back in to show the window one more time- To finish off the window portion – I die cut the same scalloped rectangle I used to cut the opening. This time on a scrap piece of So Saffron Cardstock. Using the Paper Trimmer, I cut the inside portion out just barely on the outside of the stitching.
I then grabbed the Silicone Mat and applied liquid glue to the back of the scallop border – I was generous but yet kept the layer of glue very think so I wouldn’t have a mess of glue seeping out onto the window sheet. (This is very hard to get off)
Tip: Use caution when applying glue with Window Sheets/Acetate sheets . Another option for adhesive would be to use an adhesive sheet on your cardstock before die-cutting. Zero mess there!
Isn’t this tag lovely. I die cut 2 of the large tags from the Tailored Made Tags Die Set. I trimmed down the white tag close to the stitch lines. I used 2 ink colors: Evening Evergreen and Poppy Parade.
Keeping the simple here with white twine and stapling the bag closed.
For the stamped sentiment I used one of the smaller scallop dies and partial cut right up close to the words. Modifying your die cut shapes is easy- just take a bit of time to line them up and use low tack tape to hold them in place before running through your die cut machine. It’s not a perfect corner match here but I like it well enough to overlook that tiny imperfection:)
You’ll notice these bags are not wax lined – I didn’t think about that before I dropped the granola in …
Next time I want to gift granola I will take an extra step of putting the granola into a cellophane bag then slide it into the oh’ so cute gift bag.
Alrighty, onto number 2!
Wine Bottle Sleeve
This project really could not be any easier! Simply cut off the top and bottom of the white sack. ‘Eyeball’ measure the length of your sack to the height of the wine bottle. Trim down as needed. This is a standard 750ml wine bottle – simple cylindrical shape.
When you click on the above photo – it will open another fun wine bottle project!
To stamp this I first stamped with So Saffron ink for the Tulips then two-step detail stamp right over the top with Poppy Parade ink. Two-Step stamp sets are so much fun!
I went back to the So Saffron color – inked up the stamp and stamped off on scratch paper- then stamped all over the background- not paying attention to where the stamp landed- I just wanted to take down the bright white of the paper sack and fill the background a bit for some interest. This is a great way to DIY your own Designer Series Paper for projects.
You really can’t see it in these photos – it’s very subtle with that color choice- but it really makes a difference in the finished product and takes no time at all.
This sack size is a perfect fit! I didn’t need any adhesive- it’s just snug enough not to slide but not so loose that it sags down. No adhesive needed to hold it on the wine bottle. Which makes it really great, the person you have gifted this to can re-use it easily!
For the oversized focal tag – remember the yellow on the window for the granola bag? This is the center portion of the So Saffron scalloped rectangle die cut. By using the Paper Trimmer I was able to perfectly preserve the shape and stitch lines for this piece to be used on another project. I didn’t worry about making it curved to fit the bottle- I simply used 3 foam Dimensionals in a line vertically to adhere the tag to the sleeve. I plan on hand delivering this wine gift and don’t need it to be a flush fit.
You sure can though: This is how I would do that – use the wine bottle with your finished tag piece – gently conform the cardstock to the shape of the bottle. Place Tear n Tape strips on the back or your favorite dry adhesive. Then slide the stamped sleeve back on bottle and affix your curved cardstock to the sleeve.
Next up…
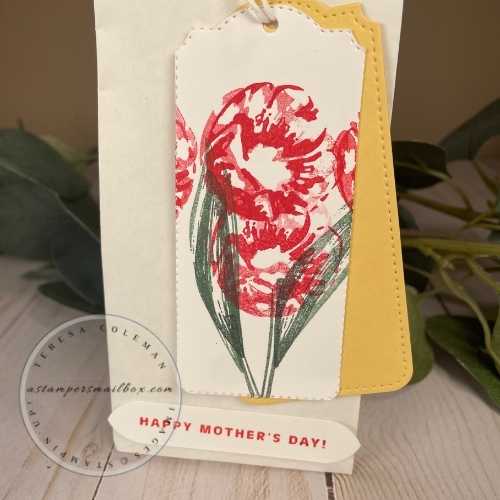
Mother’s Day Gussested Mini Sack
I repurposed the tag here to make my project making simple. I hope you will forgive that here and the fact that I failed on process photos for this project. So will provide a bulleted how to list ( sorry! )
I took this flat sack and some simple no measure folds to turn it into a gusseted mini bag.
How to:
Fold the bottom and sides back and forth about 3/4 of an inch. I use a bone folder to crease this fold really well.
Gently open the sack by putting your hand inside and flatten out the bottom.
Pinch the triangular ‘tabs’ & fold the excess paper back on itself.
Apply Tear & Tape or other dry adhesive to the triangular tabs.
Using one hand inside the sack and the other outside to flatten the tabs down to the bottom.
Now push the side creases so that the middle one goes inward to create gusseted sides.
Fold back or trim the excess top to your liking.
You can take any flat sack or envelope and make a gusseted mini bag following these steps.
Tip: if you are using an envelope- seal the envelope flap down then using a Paper Trimmer cut off one end to make a flat ‘sack shape’ like the bags I’m using.
Embellish as you like. I use the Mother’s Day greeting from the Flowering Tulips stamp set and rounded the end corners with the Detailed Trio Punch to make this shape. Super quick! Fill with small gifts like fun cosmetics, jewelry boxes, or even chocolates are great in this size bag!
Number 4
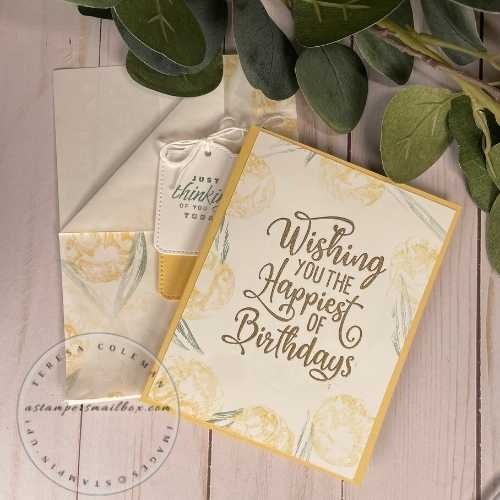
Flat Sack to Flap Envelope
I wanted a slight gusset for this so I cut 3 sides of the sack. Then scored the bottom at 1/4″ & 1/2″ . On the 1/4 fold- I turned it back on itself then used Tear & Tape adhesive to reattach. Now the bottom is gusseted. ( Not Necessary at all- I originally planned for a much thicker card and wanted room to expand).
Now, for the open side. Fold the ‘triangle flap’ as much or as little as you like.
For the card today – I had intended a multi-layer fancy card but in the end, I decided simple was the order of the day. I used the large sentiment from the stamp set ‘ Happiest of Birthdays’ (found in the Annual Catalog) along with some yellow tulips stamped with So Saffron Ink . For the greeting – I used Gold Embossing Powder and heat set. For the tag, I used the same Tailored Made Tag die – this time I modified the length of the tag by matching up the sides of the white tag to the die again but shortening the length. I love how easy it is to change up a die shape!! All the stamping used So Saffron & Soft Succulent Ink Pads.
This makes a lovely card and sleeve combo. I would use any oversized greeting card envelope or even a bubble mailer to send this out thru the postal service.
Tip: Post Office: go inside and have the postal worker place paid postage label on this rather than affixing standard postal stamp. This will help ensure your oversized cards are making it to their person!
Last but not least… Number 5
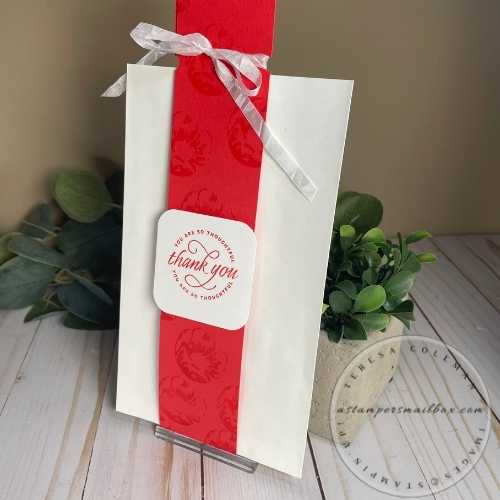
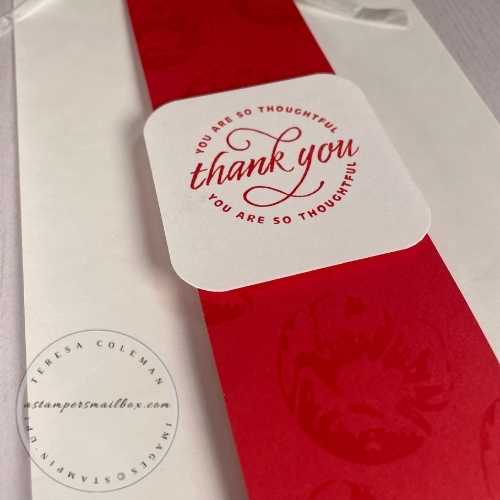
Simple Flat Treat Sack with Wrap Band Closure
Number 5 has minimal creativity but maximum ease! One color, two stamps easy peasy. I cut off the jagged top of the sack and used 2 strips of Poppy Parade cardstock 2″ x 11″. Scored one on the end at 1/2″ . I folded this end up and adhered to the 2nd strip. Then at the top of the this band take some scissors and match up the ends.
Monochromatic stamping gives the Poppy Parade cardstock a lovely, subtle look. I did not two-step stamp this project, keeping it simple by grabbing one of the tulip stamps and Poppy Parade ink and stamping away!
This time, I chose to keep the lovely white of the sacks and let the simple pop of red stand out.
For the top of the ‘Wrap Band Closure’ – I cut the corners at an angle with scissors and for the ribbon notches I grabbed the Detailed Trio Punch, One of the options on this three-sided punch is a very tiny oval shaped punch out. This is intended as a ribbon hole punch. I used it as a notch by flipping the punch over, placing the cardstock in sideways about half-way into the punch area and pushing straight down. In this photo the ribbon is hiding the notches, but it makes a great way to hold a ribbon in place without adhesives. The ribbon I chose is the lovely, lightweight Whisper White Seam Binding ribbon.
Don’t you love this Thank You sentiment? I thought about using a circular shaped die on it but in the end, I left it a square with softly rounded corners. (Detailed Trio Punch).
You can adjust the ribbon placement based on how thick gift you are placing inside the sack is. I left this completely flat as I will likely use it for an oversized card rather than a gift with any thickness to it.
And there we have it, 5 Simple to Super ways to take plain, white sacks and give them super stamping appeal! I hope you enjoyed this blog post and have gleaned some great take-aways for your crafty adventures! There are still a few days left of Sale-A-Bration (SAB) and any number of today’s products total up to $50 value to earn you a choice from the free SAB brochure of products. (SAB items are while supplies last)
Happy Find Your Inspiration Friday! Hope you have some crafty fun this weekend! I will be back to the blog on Monday with a Monday Makeover Project! See you then!


