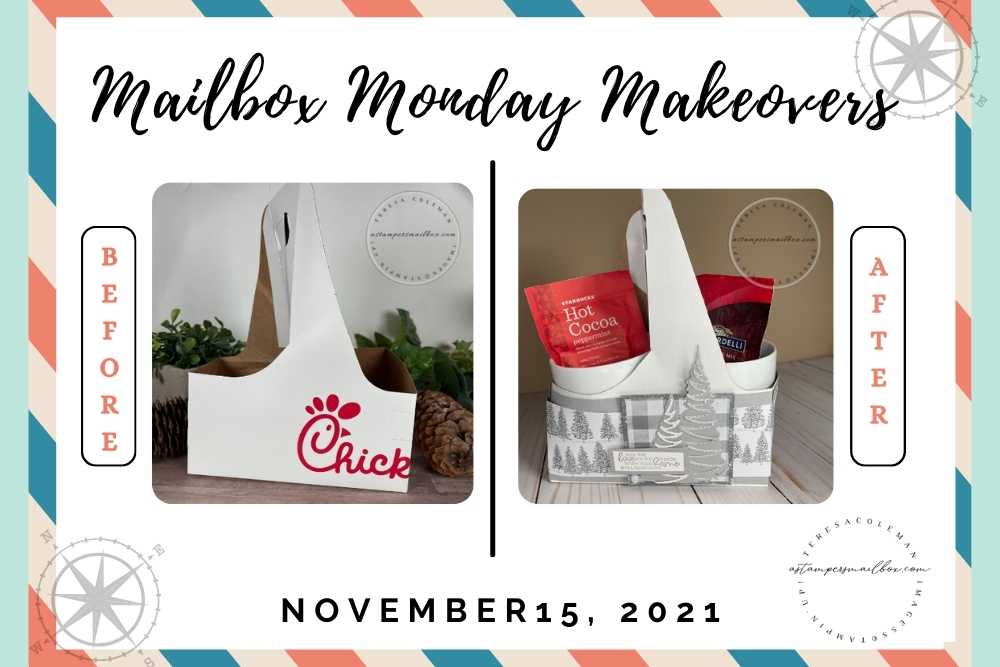
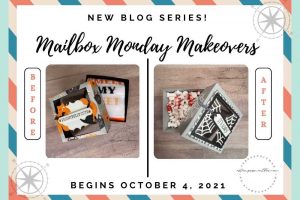
Drink Carrier Monday!
Who gets these and can’t decide what do to with them? I do- we love our Chick-Fil-A and their drive through carriers are perfect for a Monday Makeover!
Here’s what I did to this one!
Before:

After
These are alot of fun to dress up for any occasion. This drink tote doesn’t resemble it’s original restaurant logo carrier at all. Some scraps of cardstock and a bit of Designer Series Paper combined with a really nice Stampin’Up! bundle of stamps and dies for a quick makeover.

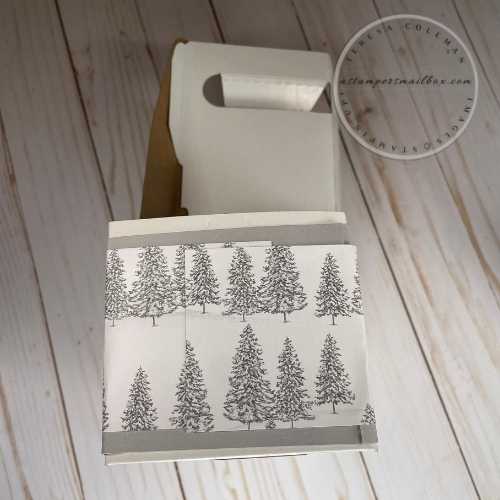
Here is how I began. This project uses quite a bit of tape. I think you could easily use Multipurpose liquid glue, it would give you some ‘wiggle room’ time however, in an application this large – I wanted quick stick of double sided tape. So I grabbed the roll of Tear & Tape. You can see the shiny strips at the top and the backer at the bottom. Using a dry tape with a backer allows you to affix the tape in one step, then the cardstock in the next step. Quickly and easily.

Next add a strip of Designer Series Paper(DSP). This project features the paper pack Peaceful Place. I like the soft grey tones for a ‘farmhouse’ look. The cardstock paired with it is Smoky Slate.
All measurements and products used will be featured at the end of the post.
Side view, ooops- the DSP is crooked a bit. I didn’t notice it until I brought the photo in to the blog. Alas, it’s homemade gifting right? We won’t sweat the small stuff!
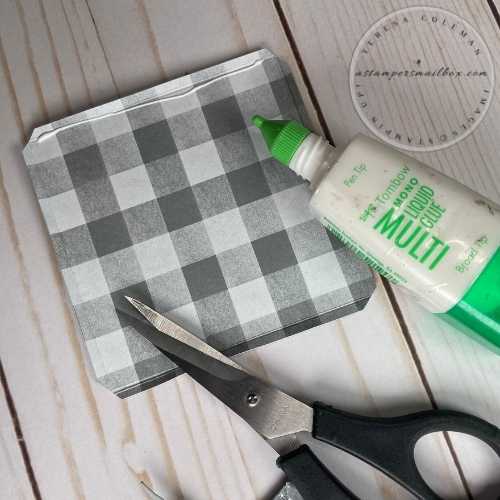
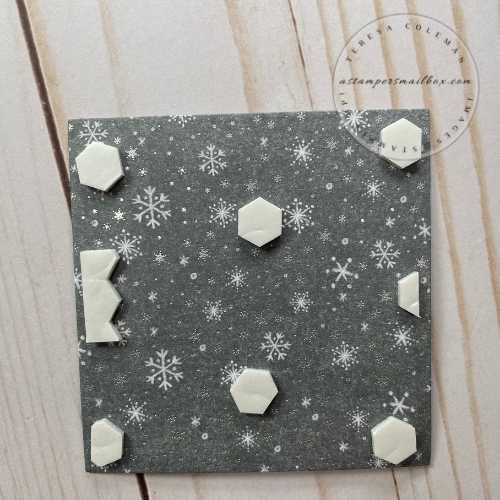
This is an easy way to ‘mat’ or ‘frame’ your Designer Series Paper. Rather than use another piece of this amazing buffalo check patterned paper to have a dark mat around it, I decided to give it a framed look. What I did was score this square of DSP at 1/8″ on all four sides then cut the corners off. Run a light line of Multipurpose Liquid Glue ( affectionately called ‘green glue’) right on the score line. Then fold the score line- using a bone folder or just your fingers to stick the paper to itself. This takes some rubbing, you don’t want too much glue and layers this tiny are a bit stubborn:)

I think that step of a folded frame finishes this piece of buffalo check patterned paper off nicely! If you don’t want to take the time for this step, simply cut another square of DSP slightly larger and flip it over. Then you will have the snowflake side peeking out as an under mat.
You could opt not to use up your patterned paper and choose a darker color of cardstock like Basic Grey or even Basic Black if you want a mat of color to frame the buffalo check pattern paper.
Here’s the back. Ready to be placed on to have lift. Stampin’ Dimensionals are a great add to your shopping cart. When working ahead for the holidays – you could prep all the layers in one crafty session – leaving them in an envelope or file until you are ready to finish assembly of your projects.

This photo isn’t the best. My light was waning and I wanted to get this project on the go for the blog post:) I used more Smoky Slate Cardstock and Silver Foil to die cut the tree and trim pieces. The smaller tree on the left is trimmed with silver foil too but, I flipped it over to the back/white side. I had them all pre-cut and ready to finish, as I was doing all the gluing – I thought, hmmm would this be cute as a pair rather than the trees be all the same silver. I like it.
Tip: plan ahead- cover the back of the silver foil with adhesive sheet before die cutting. I didn’t think ahead and ended up using Multipurpose Liquid Glue on the thin tree trim pieces to.
Boy, was that a mess.

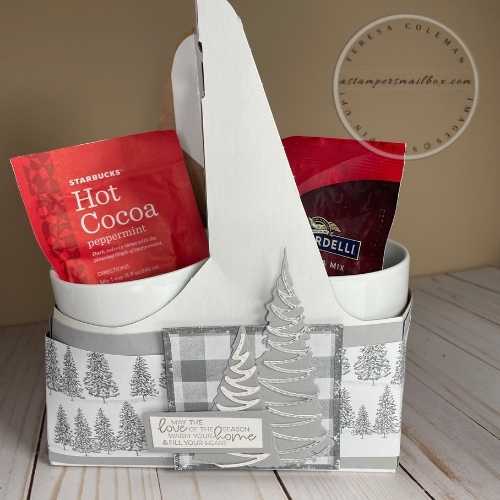
Bring all the pieces together and finish with a cute sentiment from the stamp set.
This is a minimal stamping project.

On one side I put the sentiment upper right on the other side I dropped it down to lower left.
Tip: this gives you the added coverage you might need if you have to use liquid glue to put your trim on like I did. (strategic hiding the glue oops)
Here’s some other ideas to fill your drink totes:
-
You could fill this with homemade goodies placed inside cello bags wrapped with white & grey ribbon.
-
For neighbors and friends- cookies, mini breads, DIY cocoa on a spoon/stick, brownies etc.
-
For kiddo’s – choose a DSP they would love then fill it with DIY Snowman ( jet puffed marshmallows, pretzel sticks, , candy eyes, strip candy for a scarf and squeeze frosting in a tube to put it all together. (ie:food safe glue)
-
-
For teens:
-
-
guys: a cello bag with microwave popcorn and a seasoning blend for popcorn on one side and a DVD/Blue Ray on the other. (old school) idea here – but a magazine of a topic they love like cars, computers, travel etc one one side and a gift card to their fav. store where they can shop online on the other.
-
gals: a spa kit- loofa or body pouf, travel size body wash, nail goodies- new file, polish and cuticle moisturizer. Any of this type item would make this a super fun teen girls gift.
-
-
-
For gal pals- place a mini bottle wine on one side and a new wine glass on the other. Tip: wrap some bubble wrap around the bowl of the wine glass place it upside down into a cello bag, tie around the stem. When you gift this, place the wine glass in the carrier upside down. Stem up is cute for presentation with a tag and ribbon on it as well, it makes the wine glass more stable in the carrier. Also, for breakables I always place layers of scrunched tissue paper in the bottom of the drink tote.
-
For fellow crafters: create a DIY cardmakers kit, stamps, block, card bases and layers or a finished card mailers kit that has 5 or 10 count finished cards & envelopes, a couple of nice new pens, a book of stamps and a small notepad. Thoughtful and ready for crafty mail gift! (A Stampers Mailbox loves this idea best)
-
For a sick friend: put mini Kleenex, a pkg of cough drops, rolled up napkins, plastic forks/spoons and some chocolates on one side (of course chocolate right?) and a pint of their favorite soup on the other side.
____________________________
Project Measurements:
Strips of Cardstock: 1/2″ x 7 1/2″ (4)
Strips of Cardstock: 1/2″ x 3 3/4″ (4)
Designer Series Paper: 2 1/2″ x 12″ ( 2)
Patterned Paper w/ Frame: 3 1/2″ x 3 1/2″ (2) score at 1/8″ on all four sides fold and glue down.
Accents: small and tall tree Smoky Slate with Silver Foil Cardstock trim.
Sentiment: Basic White Cardstock, Smoky Slate ink and cardstock.
I would love to see your makeover projects on Instagram and Facebook! When you make any of my featured Monday Makeovers use the hashtags
#asmholidays2021
#mailboxmondaymakeover
Mailbox Monday Drink Carrier Makeover


Price: $15.00


The tiny words ^ Project Supply List- when you click on it – you can see a printable version of today’s Product List along with ‘get with me’ information. Feel free to contact me anytime!
Thank you for joining me here at A Stampers Mailbox!
I love that you stopped in to check out today’s post!
-
When you shop with me online using this months Host Code: 94NF7VW6 You will receive a thank you ticket voucher. Click the drop down ‘shop my store’ then click Mail Box Thank You for all the details.
-
If you shop and your cart exceeds $150.00 please DO NOT use the host code- all the Host Rewards for you.
-
Shop the Clearance Rack for even more discounts!
-
Feel Free to Contact Me anytime!
-
Subscribe to my monthly newsletters. On the right side bar to fill in your email address, 2 emails monthly unless there is a special that really needs to be shared!
-
Please follow me on Instagram @astampersmailbox and Facebook for more inspiration!
-
Click on the teeny words Project Supply List above for a printable version of all the items used in todays project.
41 days to Christmas! Our days are getting away from us quick! The sale tomorrow is a great time to stock up on your needed basics of ink pads, cardstock & die cuts. Too, holiday mailings are a more ‘work ahead’ situation than ever, plan your Christmas gift giving Stampin’Up! style a bit earlier this year to ensure your shipping makes its way to you in plenty of time.
Thank you again for visiting A Stampers Mailbox – every Monday is a Makeover Project.
Next week check in to see what I do with a pencil lead package.
( yes, so many items can get a stamped makeover! )
__________________________
I would be remiss in shouting to the rooftops so I will ‘shout it out’ here –
there’s a Seasonal Sale starting tomorrow!!!!
Check out this blog post to see all the details. In this post you will also find a free printable download there!
An awesome color inventory list.
Perfect to help you get your order ready of what ink pads and cardstock you might need to replenish.
