
Coffee & Cardmakers’ Project is Spooky & Sweet!
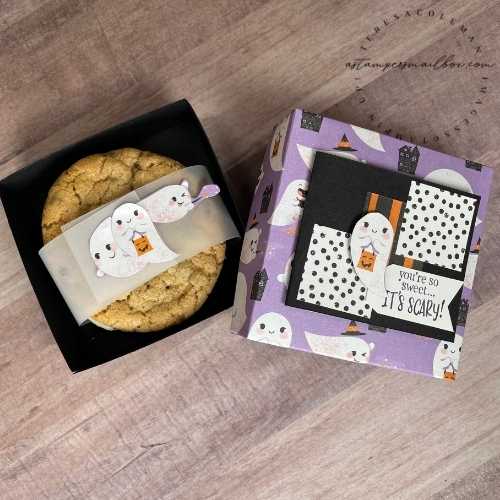
A Yummy, bakery treat gets a box! Using the box design from last weeks Facebook Live was my goal. However, this yummy cookie sandwich was too big for that box. ( Hardship, right?!?).
Measuring that monster of a cookie was step one.
Then grabbing my Zero Centering Ruler to decide size & score lines next.
Here is what I came up with, still a very simple box design using the
same easy approach that I showed in the Sept. 17th Facebook Live Video.
You can click here to hop over to see how I made that treat box
with adorable Halloween socks as the gift!
{no sugar added}
________________________________________
This box is slightly larger and a bit more shallow than it’s inspiration box.
It’s just perfect for this sugar bomb of a cookie treat!
I say that lovingly because this monster cookie was purchased at The Eatery here in Bartlesville and their bakery is so, so good!!
For the Box:
-
6 x 6 Cardstock and Designer Series Paper
-
Base: Score at 1 1/8″ on all four sides
-
Lid: Score just 1/16″ UNDER the 1 1/8 mark on all four sides
-
Finished Box Measurement:
-
3 3/4″ x 3 3/4″
-
Height: 1 1/8″
Mini Card attached to Lid:
-
2 1/2″ x 3″
Cookie Wrap/Band
-
Vellum: 1 1/2″ x 10″

Isn’t this ghostly adorable? By simply wrapping this cookie sandwich with the vellum and adding some fussy cut elements from the Cute Halloween Designer Series Paper.
This treat is now stepped up from yummy to spookster!
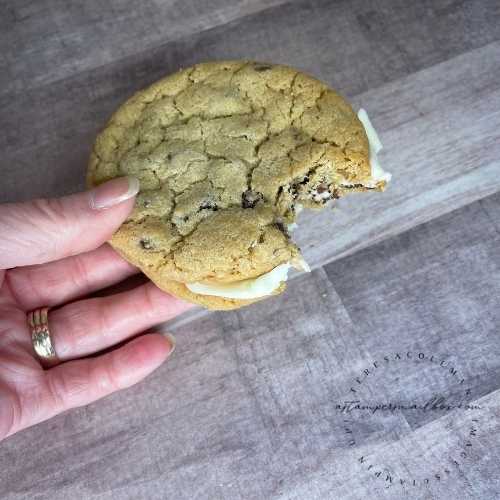
You guys… This cookie sandwich… SO GOOD!
Ok, enough sugar, here’s what I used for this Coffee & Cardmakers crafty gathering project!

By using the Black Stampin’Write Marker, I was able to add some ‘spooky black ink’ to the Gorgeous Grape sentiment – “It’s Scary”. This simple inking trick really makes your words pop!
The box lid being made from Designer Series Paper is quite lightweight with this heavy cookie sandwich inside. To fix this yet still get the lid off easily I cut two small circles with the Frightfully Cute Bundle/companion die set using this Avery 6465 Removable label- I decided to leave them plain white.
By adding a mini card to the top of the box lid, I eliminated the need for the window like I did during the Facebook Live demonstrated box. Both variations are fun for ghosts & goblins.
I didn’t attach the circle tab labels yet because , ummm we ate the cookie sandwich ( no guilt ). When it gets close to Halloween, I will have this box ready for a fresh cookie to give to a wee spookster!
The removable labels sheets are a great non-crafty supply to add in your arsenal of good stuff – they stick well but are super easy to remove making the a great option for tab type closures. These can be found in stores and on Amazon.com
Products used in this Project


